Showing posts with label ink and wash. Show all posts

Friday, 5 February 2021

Morris Minor Traveller


Trivia question for you. What was the first British car model to sell more than 1 million? Well, it wasn't the Traveller, but it was generally the Morris Minor, and for most Brits of a certain age, this particular car was a common sight while we were growing up. Here's the links to the timelapse and the tutorial videos on Youtube:- 

Morris Minor Tutorial

Morris Minor Timelapse

If you do go to the Youtbe Channel, it would be great if you could subscribe to my channel - and that way you'll get the latest content as soon as it's published.

Thursday, 4 February 2021

Volvo P1800 and link to Videos


I went a little bit more exotic for the first new painting of this week. I wonder how often Volvo cars have been described as exotic? This sports coupe, though, is far from what you'd expect from a Volvo. It's a gorgeous P1800 from the 60s. This was the car that Roger Moore's The Saint drove, although his was white.

So - that's cars from the UK, France, Germany and Sweden so far. 

Do you have a favorite car? If so, why not leave a comment, and who knows, it might well feature in one of my future videos. Meanwhile, here's the link to the tutorial: - 

Volvo P1800 Tutorial

- and here's the link to the timelapse video

Volvo P1800 Timelapse

Saturday, 30 January 2021

Hillman Imp and Timelapse video


This is a Hillman Imp. The Rootes group, that built it, was an amalgamation of British car manufacturers including the previously independent Hillman and Singer marks, in competition with BMC, the amalgamated Sutin Morris etc. which became Leyland in 1968. The Imp was Rootes' answer to the Austin Mini. In one way, the Imp, which was a similar size to the Mini, was innovative, since its engine was in the read, like the VW Beetle. I was moved to add an Imp to my collection of car paintings, since a blue Hillman Imp was the first car I ever owned. My beloved grandmother bought it for my 18th birthday. Alas, I would soon learn that I was several years short of being ready for driving, but I don't blame the car for that, and think back to it fondly as a gift given with love. Here's the link to the timelapse video on Youtube, and also to a tutorial video. If you do make your own, I'd love it if you posted a picture of it here in the comments. Here's those links: - 

Timelapse Painting of Hillman Imp

How to Paint a Hillman Imp Tutorial

Wednesday, 27 January 2021

Austin Mini and Timelapse video

 If you're doing iconic cars of the 60s and after, then sooner or later you've gotta do a Mini.


I'm pleased with how this turned out, especially considering that I actually realised too late that I'd made the side too long. Thankfully the paint job makes all the difference. I went for this iconic colour scheme, with the union jack roof because I really wanted the full classic mini experience. 

I'll pst the instructions and tutorial within the next few days. Meanwhile, here's the video.


Drawing the Rover P5 - Instructions and process photos


1) I'm so happy if you've decided to have a go at this one. There's a lot of stages, but it's definitely do-able if you take your time. So, do you have your paper and drawing implement? As before, if I was just drawing this for myself I'd have started with pencil, but it's much easier to see ink marks, so I've gone straight in with ink.

So. let's start in roughly the centre of your page. Draw an oval - quite a fat one, but not quite a circle - slightly taller than it is wide. Draw another line around it just outside the outline. That's the headlight nearest to us 

2) Now, underneath and slightly to the left, draw a slightly smaller oval. There needs to be a small semi circle to the left, to make the chrome border of this second light. 


3) Just to the right of the bottom of this second light, draw a much smaller oval. Then an upside down hook, which will make part of the bumper.
4) Now we'll draw the left hand edge of the radiator. The radiator is such a striking feature of this particular car. Go from just above the upside down hook you drew in stage 3. Go upwards, and ever so slightly to the right, until you reach a level about 2/3 of the way up the headlight. Now curve round to the right. 
5) Now we're going to sketch in the rest of the outline of the radiator. At this stage, take your time. Look, look, and look again, so that you can get the angles of slant, and the length of lines as right as you can. I'd do the bottom line first. That way, you've got the line which the bumper will follow when we come to do it. Then draw the line of the top edge of the radiator. It should slant upwards from the left, to just over halfway along the length of the bottom edge of the radiator. Then it should slant downwards to the right to the point where it's above the end of the bottom edge. It doesn't matter if it's slightly further. Now curve a line down from the top edge to the bottom. Once you're happy with this, you've actually done a lot of the heavy lifting as regards working out angles and distances for the 'face' of the car. Well done!

6) Now, look where the first headlight we drew sits in relation to the top of the radiator. We're going to draw the headlight on the right. Now it's position should be a mirror image of the first, but it needs to be a little bit smaller, since it's further away from the viewer. The outer line can also be a little furtheer away from the inner line that it is on the first headlight - you could almost have it touching the curving corner of the radiator, and it would be fine. 
7) Now draw the slightly smaller light underneath this right hand headlight. Leave a bit out of the bottom, though, for the bumper post. Again, look at the photograph so you can get the positioning right, and then just draw those marks at the bottom of it as guidelines for the bumper post. 

8) Now we start the bumper. Go back to the upside down hook beside the tiny left hand light that we drew in stage 3. draw that shape - a bit like an iced finger bun - um - finger buns! - to make the bumper post. Now make a small line underneath and parallel to the bottom edge of the radiator. Make another parallel line beneath it, connecting to the bumper post. Finally join them up with a convex curve. Great! All the rest of the bumper will now be so much easier for you.
9) Now we're going to start drawing the number plate (license plate). This is easy ow we have that bit of bumper drawn in from stage 8.The top of the plate should be parallel to the bottom edge of the radiator, and go from the bumper we drew in stage 8, to underneath the bottom right hand edge of the radiator. The corners of the plate should be slightly rounded. 
Look underneath the right hand lights,. We're going to finish that bumper post now. It should be fatter, but slightly shorter than the one on the left. 

10) You can complete the number plate now, Notice that it does stick out quite a bit below the bumper. There's also that backwards capital D sticking out from the left hand short edge of the plate. Now, eye time again. Look at the bumper stub we drew in stage 8.Now, draw an imaginary line from the top edge of the number plate, curving upwards to the right hand bumper post. Now draw it in with your pencil/pen. Now, draw a line parallel to the one you've just drawn from not quite halfway down the right hand edge of the number plate. Finally draw a line from the right edge of the bumper post, curving very gently upwards away rom the lights, to about the same height as the centre of the right hand headlight. The face of the car is really taking shape now. 
11) Now draw a little long oval on top of the line on the far right. That's a light. Do a small semi circle sticking out of its left hand edge. Move a bit higher, and a little to the right, draw another oval, taller, than its wide, and a close second line outside it. Now draw a small curving line joining these two lines up. 
12) Now we start on the bonnet (hood). Now we go in an upwards curve from the top right hand corner of the radiator grille, and the line should end above the centre of the radiator. Really look at the photograph to get an idea how high above the radiator your line should be. Look at the distance from the tp to bottom of the left hand headlight. That's the kind of distance you should be aiming for, and slightly less if anything. 
13) Now, start at the top right end of the line you just drew. Go down the line just a little bit. Now from that point, draw a line to the right very gently curving down to the top of the top light on the far right. Can you see the body of the car starting to appear?
14) Now, just about a third of the way along the line you drew last time, we're going to draw a mirror. Do a little circle above the line,(yes, you CAN draw a circle this time!) then a little stalk slanting downwards to the right until it meets the line. Mirror done. 

15) Okay . Now I want you to make a dot. Yu want a point which is above a space between the left hand headlights and the left hand edge of the radiator grille. It should be on a level with the top of the mirror you just drew last time. Turn the dot into a small - very small - ring. 
16) Now we're going to continue the bonnet line. Gently curve it round to meet the little ring shape that you drew in the last stage. Now draw a line from that ring shape curving gently down to the centre of the top of the radiator grille. The curve should be shallower at the top, and more pronounced as it gets closer to the bonnet. 
17) We're cooking on gas now, good people. The right hand front wheel is next. Draw a semi circle from the bottom right hand corner of the number plate, to join the plate again in about its centre. Now draw another line from the bottom of the bumper post which makes a parallel curve, but at the bottom of the curve, instead of curving back upwards, make the line meet the bottom of the other semi circle, to make the bottom of the tyre. It should be slightly slanting downwards to the left. You can put another two curving lines inside the wheel now to make the tyre tracks. 
Now, inside the outline of the radiator grille, draw an inner outline. This should make the chrome surround, and it needs to be thicker moving towards the centre of the top of if. 
Then, make the bar from the top centre of the radiator, to the bottom centre. It's like a long, curving, downward pointing blunt triangle. 
FInally, there's a little bar on top of the number plate. The top of it goes parallel to the top of the number plate, but not quite the full length of it. 
18) Last stage was a long one, so there's a lot less to do for this one. Look at the two badges I've drawn in the blank space inside the radiator grille. These aren't essential if you don't fancy, but it really doesn't matter if yours are a little misshapen. 
19) Analytical eyes needed again for this stage. We're going to draw the left hand end of the bumper. Do the top line first. It should replicate the same slant as the number plate. Start from the left hand edge of the bumper post. Extend the line until it is as far left of the lights, as the lights are left of the radiator. Now curve it round and upwards until it matches my photograph. Now make a line parallel to this one from lower down the bumper post and round, then when curve it round to meet the first line, just as in the photograph. 
20) More lights now. There's a curved oblong which should be the same height as the centre of the left hand headlight, and which should be almost as far left as the end of the bumper. Then a small oval light to the right and just above it. Believe it or not, you're halfway to a finished picture now, and about 2/3 of the way through the drawing stage. Don't give up now!
21) Now for the wheel arch. My advice is again, look, look, and look again at the photograph before you start. Now start slightly left of the bumper, and I do mean slightly. Now imagine you're drawing an upside down capital U. The top of the curve would be level with the top of the left hand headlight. You have t make the U slant a little bit to the left - not too much, though. Well done! Now just make both of the legs of the U slant down and to the right a bit. The leg on the left should not be quite as long as the leg on the right.  
22) Now for the wheel. Draw an oval. It Should just touch both sides of the wheel arch you drew in the  last stage. The top curve should end quite a bit under the top of the wheel arch. Look carefully at where your oval should bottom out in my photograph. When you're happy with your oval, them draw a sort of J shaped curve from the bottom of the oval to join the bumper, pretty much directly under that curved rectangular light. Now draw a small oval in the centre of the wheel. This will be the hubcap. Look how it's further from the edge of the wheel at the top and bottom, and closer at the sides. 
23) Eye time. Look at the distance across the width of the wheel you just drew. Keep that distance in your mind. You're going to draw the end of the front of the car to the left, and it needs to be that distance left of the wheel. Most of the line is straight upwards. At the bottom, it can curve round and then down to the wheel arch. Stop the line at just a bit higher than the top of the wheel arch. Now draw a very slightly curving line, touching the top of the wheel arch, down to the left hand edge of the curved rectangular light. Now draw a line parallel to this and slightly above it. You've just made the chrome trim. Now we're going to another line parallel to this chrome trim. This is the left hand edge of the bonnet. Start from the top of the left hand headlight. Extend this curving line, parallel to the chrome trim, and touching the top oval light on the way. This should end on the left above where the chrome time ends. Now just draw one small slightly curving line to join up the trim with the bonnet line. 
24) For this stage we do the top edge of the bonnet, and also a mirror. The easier way is to draw the whole bonnet line first, in a gentle convex curve from the top left hand end of the last line you drew in stage 23, joining the bonnet line at the little ring shape you made in stage 15. Then draw a little stalk from the top left hand edge of the bonnet, directly above the centre of the wheel arch. At the top of the stalk, draw a circle for the mirror, which will bisect the bonnet line. I drew the mirror in first because I'm drawing in ink, which means I can't rub lines out as you can in pencil. 
Now, go back to the little oval light above and to the right of the curved rectangular light. Can you draw a line downwards, and towards the bottom of the line, curve it down to the left to meet the bumper. 
25) Now the windscreen (windshield). Try the two upright edges first. Go from where the top edge of the bonnet means the left hand edge of the bonnet. Draw a straight line upwards, and slanting very slightly inwards to the right. Look closely at the photo to see how far up you should go. It should be quite a bit shorter than the line down from the sane point. Now we're going to do the right hand edge. This should start from the top edge of the bonnet. Now it should start from a point above about halfway between the left hand edge of the radiator, and the centre of the radiator. This line should go to about the same height as the left hand edge, but it should slant in to the left more than the left hand post slants in to the right. It's all to do with perspective. Now we're going to join these two edge up. Start at the top of the left hand edge, and draw a convex curve around and down to the right hand edge. The curve needs to be more pronounced to the left, and gentler to the right. 
25) Let's complete the face of the car now. draw a line curving upwards and away  from the top edge of the windscreen. I wouldn't go quite as far up as I did - this was my first big mistake in this drawing. End above the left hand edge of the screen. Slightly inside the outline of the windscreen, can you draw another line to make the runner seal of the screen. 


26) Now we've done the hard work drawing the face we can speed up a bit. Now, take the spot where the bottom left hand corner of the screen joins the top corner of the bonnet. You're going to continue the line of the bonnet to the left. However this should slant upwards far less, in fact the line should be almost horizontal. Look at the photograph o judge the distance. As a rough guide, it's about the same distance as the downwards line on the far left is from the curved rectangular line. Now make a line going left from the top left hand corner of the screen. This one should be slanting downwards, very gently tapering towards the last line you made. but ending before that line did. Draw a straight line slanting downwards to the left, to meet up with the lower line, and another line parallel to it and just inside it. Now, working left from the top line you've drawn in this stage, go past halfway along it, then draw a line slanting down to meet the other line. The slant should not be as much as the other downward lines you've just drawn. And that's the side windows. 
27) Now we'll take the line at the bottom of the windows, and extend it to the left a bit. It should curve downwards. Don't take it very far, it should be about the same length as the distance from the left edge of the back window halfway to the right edge of it. Just start the straight line downwards from the end of the line. This will be the back of the car. 
28)Continue the line of the chrome trim, curving slightly downwards. Extend the line of the back of the car down to meet it. Draw a small curved line from the bottom of the post between the windows to meet the top of the chrome trim. Now just draw those two oval handle shapes, one at the bottom of the rear post, and one below the line between the two windows. 
29) Right, here's my second big mistake. Now We're going to do the edges at the bottom of the side of the car. I made my slant upwards too steep for my liking, and did adjust it as I came towards the end of the drawing. You need to draw one line from the bottom of the front wheel arch, going straight back an upwards to the left until it ends at a point which is beneath the inside of the back window, not quite as far as the rear post. Look at my photo, and try not to make your upwards slant quite as pronounced as mine. If your're working in pencil it should be easier for you to make adjustments. Now, I want you to draw another line a little bit above this one, and tapering slightly towards it as it goes. This has made the bottom edge of the doors. 
30) Now we finish the back of the car and draw the back wheel and the back wheel arch. You could continue drawing the line of the bottom edge of the car, and extend it left until it almost but not quite reaches a a point at the back end of the car. Now you can draw a line down from the chrome trim to the bottom edge of the car, curving round to meet it. Then we can draw the wheel and wheel arch on tp of it, and rub out what we don't need. Now, the upside down U of the wheel arch needs to slant more to the left than the front wheel arch did. Take the curve from the bottom left hand corner of the doors, right round but not as far as the back edge of the car, down to the bottom line you just made. Draw a semi circle from the left hand bottom edge of the wheel arch around, to eventually meet the bottom of the car, like a mirror image of a  capital J. Then draw in the thing oval inside the curve you just made, which will be the hub cap.
It was when I'd done this that it struck me that the slant on the bottom of the car was too much exaggerated.  
31) You can see the fairly heavy remedial work I've done on the side of the car here. Please don't worry is you find yourself doing things like this. You can rub out any pencil marks you don't like, and even with ink, the colour layers hide a multitude of sins. Altogether now - we're not making a photograph!
That's the drawing done. It's been a bit of a marathon, but the front of the Rover P5 is quite complex, and worth taking time and trouble over. 
32. I had in mind to do a two tone job on this car, since I've seen some which have a colour scheme like this and it really makes them look a bit special. I was going to go bluey purple and crimson. As always, I started with the front wheel arch. I really liked the way the colours worked out on this, and decided that I wasn't going to do too much more with the front tyre, although the wheel arch would need darkening. Because these were largely going to be the colours of the car, I spattered early this time - charge your brush with paint, and tap it on the side of another brush to get the drops of spatter on the page. I also used a very very watery blue as a base for the shadow between the front wheels. 
33. So this is the first layer of watercolour applied to the bodywork. You can probably see the mistake I made here. I applied the purple to the side first, and mistakenly took it past the wheel arch. It was only then I checked some photographs and found this went too far. The purple should have only been below the chrome trim, and not past the top of the front wheel arch. When I applied the light crimson colour, I had to go over the purple in those places. I did drop just a hint of the purple into the wing on the right to add some more visual texture. 
34. I applied a watery light blue to the left hand side of the bonnet, as a reflection of the sky, and also applied a little of the same to the edges of the windscreen. I also added a very light grey pillar in the centre of the screen. I used a watery brush to also lift some of the colour from the right hand side of the top of the bonnet, and the top of the line stretching back from the right hand headlight. On the underside I applied another layer of purple to darken it even more. A stronger application of the crimson under the car, and on both sides of the radiator working up from the bumper helped to give definition to the shapes around the lights. At this stage I thought that I needed more of an contrast between the purple sides and the crimson. 
35. I applied a dark blue on top of the purple, to give me the contrast I wanted. I also used a watery light blue to outline the windows on the right through the screen, and the rear window as well. I used a moist brush with no paint to just spread the paint past the edges of the car in places -most noticeably at the back of the car. This completed the levels of watercolour, and from here I moved to the brush pens. 
36) I used a black brush pen to darken the top of the front wheel arch. I used a wet brush to pull down some grey and then used the same brush to apply the grey to the interior of the car. I used the black pen to darken the underneath of the underside of the car, and used the went brush again to pull down the grey shadow you can see. I darkened parts of the wheel on the right as well, and created a few shadows between the bumper and the lights. Using the wet brush to pick up some pigment from the black areas, this allowed me to apply grey to the bottom half of the bumper. Finally I used it to also add a little grey shadow to the bottom of the tyres. 
37. I used a 0.8mm fineliner to craw in the rubber seal of the windscreen, and to give some shadows to the edges of the side windows. I switched to my 0.1mm fineliner, and started going round the outlined of the lights, bonnet, radiator and the chrome trim on the sides. Running the wet brush over the black areas I picked up the grey to fill in the radiator grille with, and the top half of the interior of the headlights.  
38) Nearly there now. I used the 0.1mm fineliner to do the outlines of the rear window and the windows on the right. I've drawn in the details on the headlights. I also applied a brown brush pen to darken a few areas on the edges of the bonnet. I drew in more of the details of the radiator with the horizontal bands, prior to finishing the radiator grille. Up to this point I hadn't made my mind up with the number plate. 
39) To finish I shaded in the details of the radiator grille. It takes a bit of time and a steady hand, but it's well worth it. I shaded in the badge on the right in black, and applied some blue to the RAC badge on the left of the grille. The curved rectangular line needed to be made orange. Finally I drew in the (made up) numbers on the number plate, and shaded the rest in black fineliner. Oh, and signed it. 

Considering the mistakes I made while I was making it, I don't think it looks too bad. If you've had a go, and made your own, I'd love to hear from you, and even better, if you posted a photo of your picture, that would be great. Good luck!


Monday, 25 January 2021

Rover P5 and timelapse video

 Another really lovely old car from the 60s. These Rovers were nicknamed 'poor man's Rolls Royces' although frankly they were way beyond the financial reach of anyone who wasn't worth a bob or two. Here's the finished picture, with the time lapse video below. I will eventually post stage photos and instructions, but it might be a few days.


Sunday, 24 January 2021

Ford Anglia, and time lapse Video

 Right - here's my latest -


This is a Ford Anglia. It was one of the most popular family cars in the UK in the 60s. Today it's probably best known as the Weasley's flying car in "Harry Potter and the Chamber of Secrets. I decided not to go down this route, and instead plumped for a Police car version, Inceidentally, when I was growing up we'd call police cars with this distinctive blue and white livery 'panda cars' because of the broad stripes.

Here's the video - I will post the tutorial instructions as soon as I can.


Saturday, 23 January 2021

Drawing the Beetle - tutorial

 Anyone can draw a relatively straight line. Anyone can draw a curved line. Well, when you boil it down to basics, that’s all any drawing really is, lines on a page. So it really comes down to assembling the right lines in the right places.

So we’re going to draw a lovely old VW Beetle. Sometimes you’re going to make straight lines. Some times you’re going to make curved lines. You can do that. You can draw with your hand. What I want to help you do is to draw with your eye.

Your eye is just as important as your hand. Your eye has to tell you where your line is going to start, and where it’s going to end. It will tell you how steep or shallow your curve is going to be. It will tell you how high up a particular line ends. You might even find that it helps you to make a dot on the page where a particular line will end, and then ‘draw’ the line in your mind’s eye before you draw it on the page.

If you’re tentative about drawing, or just starting out, or are worried that you don’t have the ‘talent’, well, have a go at the stages I’m going to show you. Don’t think about the finished picture, just the next stage. One stage at a time.


1) We’re going to draw the car facing to the left. I started by drawing the headlight, because it’s about halfway along the length of the page, and about a 3rd of the way up. It gives me a reference point around which I can draw the rest. It’s an oval, thinner than a full circle, with a fatter semi circle joining it on the right. Try it, and don't worry about what comes next. 

2) You make one curving line for the top edge of the fender. Think of it like this - we’re going to draw the face of the car before we do the full outline. I’d usually start with pencil, and then go over it with ink, but ink shows better for demonstrations so I've gone straight in with the pen. Don’t get too worked up about proportions. If you’re working in pencil you can always make adjustments. Just make that nice very gentle curve upwards. If you like, make a small dot where the line is going to end, join it up in your minds eye, then draw it when you’re happy.


3) Now add the slightly more complicated curve underneath, joining it back up to the top curve. Look at where it starts on the left, underneath the headlight. Do it in stages, curve it upwards to just above the level of the headlight. Now curve it round, and then steeply down. If you look carefully, you’ll see we’re not quite going as far down as the start of the line. Now, from the bottom of that line, go upwards and slightly to the right, and then curve right round to join with the top of the fender that you drew last time.  Now you’ve pretty much completed that first fender. Again, don’t get hung up about whether you have the proportions right . Repeat after me – we are not trying to make a photograph!


4) So we start to work our way to the right along the front of the car. Make these two little lights – just like you made the headlight. Not circles - ovals, with small semi circles on their right sides. The nearest one should just touch the bottom of the first mudguard line you drew. The one alongside it should be slightly smaller, and slightly higher.


5) So now we start to add the bumper. You might find it easiest if you make a little dot level with the centre of the headlight, not quite halfway between the centre of the headlight, and the left hand edge of the page. This isn’t quite the edge of the bumper, but it is where the rope wrapped around part of it ends. Draw a relatively straight line down to the bottom of the two small lights you just drew. Draw another line slightly underneath the bumper from about halfway along almost to the small lights. This is the top of the number (license) plate. Draw a ring around the bumper, just to the left of the number plate, then link it up with the end of the bumper. Draw in the other lines to complete the plate. Now go back to the top line of the bumper, and curve it very gently upwards to meet the bottom line of the fender. Finally, at the bottom of the fender, where it just starts to curve upwards. Make that very small line curving down, which will be the edge of the bumper.


6) This stage is the longest yet, but when you’ve done it, your car will already be looking like a Beetle. At the end of the bumper, on the left hand side, just extend it curving upwards slightly. Draw in the bottom of the bumper, and then make the lines to make it look as if there are coils of rope around the left hand side, next to the number plate. Look at the nearest fender. Draw a straight, upwards line, from just left of where it extends downwards, to slightly about the height of the curve of the top of the fender. Then draw a slightly curving line from the top of the curve of the fender to this line. This creates the edge of the bonnet (hood).

Now make a small dot, above the one of the two small lights above the bumper, that is on the left. It should be slightly higher than the top of the edge of the fender on the right. Starting from just above the top left-hand edge of the number plate, curve a line slightly to the left, then to the right to join up with the dot you’ve made. This is the other edge of the bonnet. Now, to the left of the top edge of the bonnet, a little way above the bumper, you’re going to make the other headlight. It should be a smaller oval than the other headlight. Don’t forget the slightly wider semi-circle on the right-hand side. Then about a third of the way down the oval, draw in the ‘eyelid’, like a wide, short triangle.

From the top of the light, draw in a curve slightly upwards and to the right to meet the edge of the bonnet. They should meet at about the same height where the nearest fender starts curving downwards. Finally, draw a short, slightly curving line, from about halfway down the left hand edge of the far headlight, to meet the bumper.


7) There’s not so much to do in this stage, but it’s important. Firstly, draw a line to link the top and bottom edges of the hood. It should make a very slight convex curve. Look at the downwards angle it makes. This should be less steep than the downwards angle of the bumper you’ve drawn. If you need to lessen this angle, redraw the line going from slightly further down on the top of the hood.

Now we’re going to start to draw in the nearest of the wheels. This is a much taller and thinner oval than the headlights. It should be furthest away from the right hand edge of the fender, and curve closest to the fender on the left, where the fender starts to curve down to the bumper. I’ve deliberately ‘bent’ my oval, but you don’t have to do this. A regular one will work just as well. Finally start from the right of the oval you’ve drawn, and use a more gentle curve to join it with the top of the fender. You can also draw another short curve down from the front of the fender to make the edge of the tyre.


8) We’ve almost completed the face of the car now. Draw in those two lines in the bonnet. They should be curves, which start about a quarter of the length of the top of the bonnet in from the right hand side. They can largely reproduce the curve of the top edge, converging almost in the middle of the bonnet where it reaches the bumper. You can also draw in the two curves inside the edges of the bonnet.

Now we draw the windscreen (windshield). The lines on the sides of the screen both slant towards the right. However the one on the right should have the more pronounced slant. This helps give the car more dramatic perspective. Both should reach a similar height. Join them with a very gentle convex curved line, but the curve should be more pronounced where it joins the line on the right.

9) Now we’ve completed the face of the car, we can start on the body. I’m deliberately exaggerating the perspective of my beetle, so I’m consciously drawing the body of the car rather shorter than it is in real life. Make a dot on a level just above the centre of the wheel you’ve drawn, and about twice the distance across the wheel. Then draw a curving line from the dot to the bottom of the fender. Then make another dot, a little to the right of the end of the line you’ve just drawn, and on a level with the top of the fender. Draw one straight line from the dot to the top of the line that comes straight up from the fender, which meets the line of the hood. Now join the two dots you made. Drawing downwards, go slightly to the right , and then leftwards to join with the line on the bottom.

Also, to finish the windscreen, can you draw another line just inside the outline all the way round. This will make the rubber seal.

10) Now we’re going to make the side windows. Make a line slightly to the right of the edge of the windscreen. It should curve away from the windscreen as you get close to the top and should not quite go so far up. At this stage it might help if you draw in the little handle shape inside the body panel you drew last time. The handle should be about 2 thirds along the length. Now you can draw the bottom edge of the window you’ve started. Don’t go quite as far as the handle, then draw an upwards line, not quite to the level where you started curving it away from the windscreen. Then draw a line connecting the left and right top edges of the window. Now. Extend this line, curving quite sharply downwards to connect with the top right hand edge of the body panel. Now, just very lightly draw a line just inside the outlines of the windows, just as you did with the windscreen.


11) Basically there’s the roof and the back wheel left. I did the back wheel first. Now, I began by making a line from the bottom of the body panel. It curves around, away from the panel to about halfway up the panel, then back down and round. Then I drew a curve from where this ender curves back round, and this curve goes up to where the body panel curves back round from right to left. For the back wheel, I drew a very thin oval, from about the same level as the bottom of the body panel, up to join the fender before it’s complete. Then a wider oval outside this first one, which extends a little further away from the inner oval at the bottom. This outer oval should be peeping out below the level of the body panel. Finally, from the bottom of this outer oval, draw a line curving gently upwards until it meets the body panel.


12) Last section of the drawing stage is the roof line. So, draw a line which very gently curves upwards from the left hand side of the windscreen. This upwards curve should start curving more steeply downwards from above the right hand edge of the windscreen, joining the top line of the side windows where they start to curve steeply downwards.

And that’s it, that’s the drawing stage of your beetle done. Now, how you colour it, what media you use, what colour scheme you use is up to you. I’m going to use a two tone colour scheme. Strictly speaking it should be read with white panels. However, I’m substituting yellow, as I can get better paint effects that way.

The materials I use are watercolour paints, and water soluble brush pens.

13) I started with the font tyre and the wheel arch below the fender. This is just watercolour. I tend to throw the kitchen sink at the front tyre in terms of colour, because when they’re wet, the colours can give some nice effects when they mingle, and it doesn’t have to affect the colour scheme of the car’s body. Also, I’ve learned not to worry about staying between the lines. Taking a looser approach can add energy to your picture and stop it from laying flat and two dimensional on the page. Also you might want to allow some of your colours to mingle underneath the bumper and the body of the car between the wheels. When I did this I noticed that I hadn’t drawn in the line marking the end of the body panels, and making a very small running board between the fenders, so I drew this in. In this stage the colours I used were

Red – this will be the main colour of the body work, and I let this seep from the fender, through the wheel arch onto the tyre.

Yellow – on the tyre

Blue, on the tyre

Black, very watery, on the tyre, underneath the bumper, and between the wheels. An even more watery grey is on the front wheel as well.

Blue – on the tyre, under the bumper

Purple – just a hint beside the bottom of the number plate

Viridian green – very lightly between the wheels.

14) Before I began the bodywork, I spattered the colours I’d already used. All this meant was that in turn I charged the brush with each of the colours I’d used. I tapped it down onto another brush above the paper to create the spatter. With this kind of picture I always want to try to bring energy to it, and to make it pop off the page. This helps. I applied a quite watery red quickly to the bodywork, and then the yellow to the panels. This created the blush where the red has seeped into the yellow. Some blush is quite intentional, but it’s difficult to judge just how much you’ll get. Go with the flow, and don’t worry about it, is my advice.

While it was still wet I just introduced a little blue beneath the windscreen as well. I allowed the paint to dry quite a bit before I applied the red again to create some of the detail on the bonnet and fenders, and used the yellow for the rope on the end of the fender. Finally, although the scanner hasn’t picked it out very well, I used a light blue wash in the windows.

That was as much as I wanted to do with the watercolour paint. Don’t worry if you think it looks a bit of a mess at the end of this watercolour stage. I always think that my pictures look a mess at this stage.
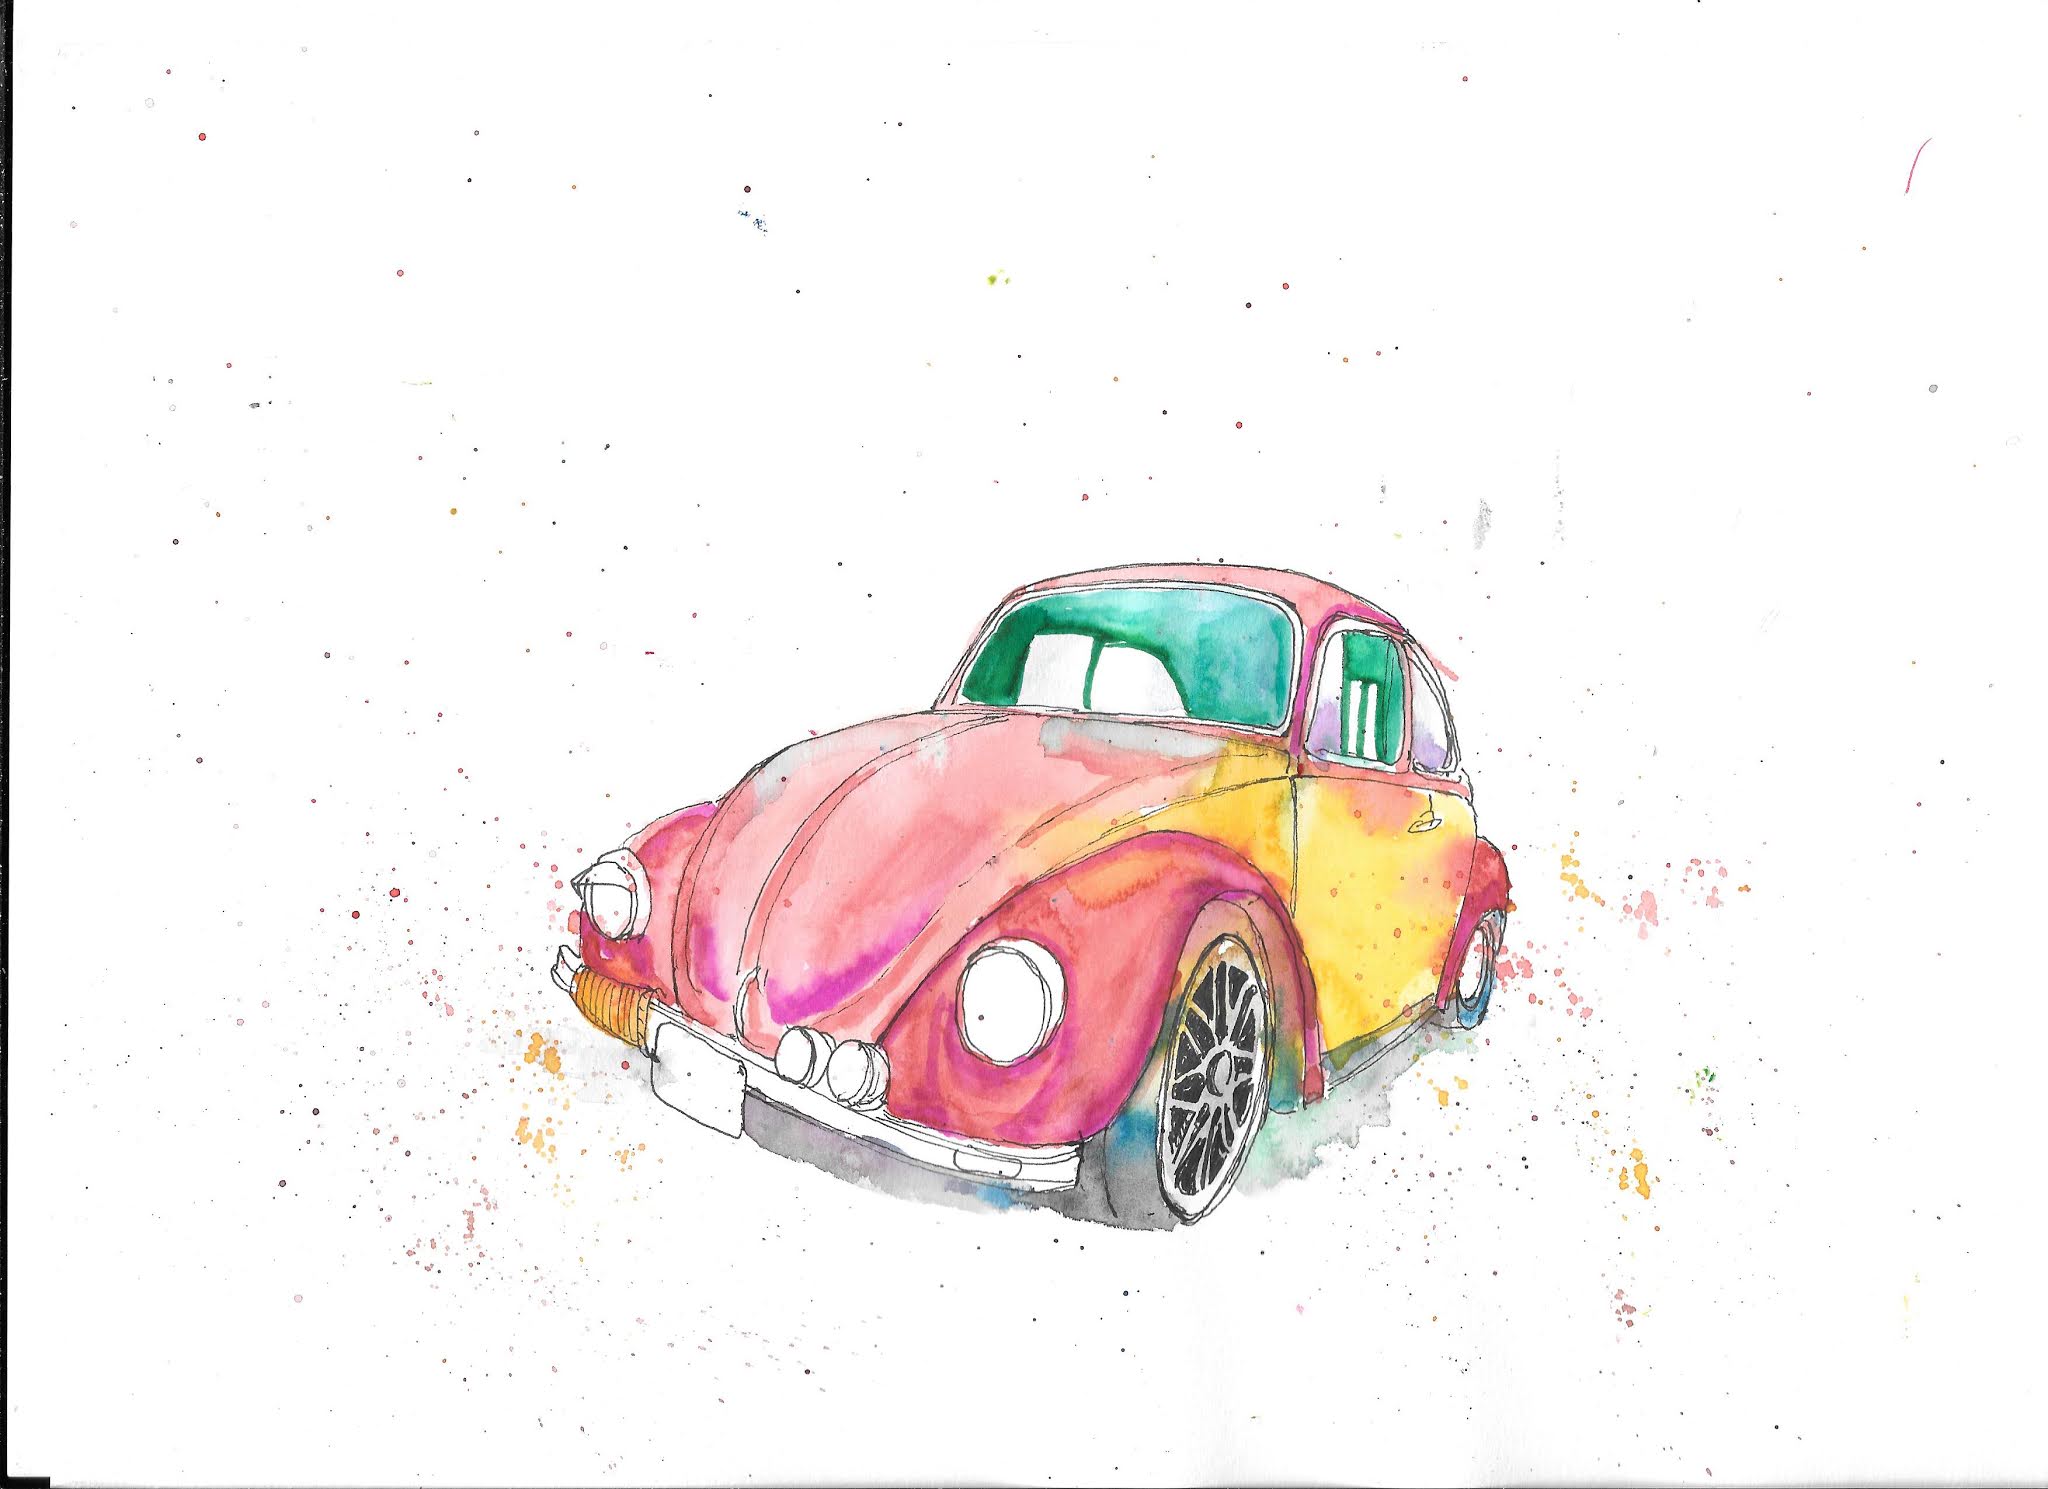

15) Here’s where I’d started applying brush pens, and also using my black ink drawing pens as well. I could have used a black brush pen and a waterbrush to get a grey interior, However I went with the green, partly because a couple of my reference photos show the interiors with a dull, greeny tinge, and partly because the green really contrasts with the dominant red of the bodywork. I used the green brush pen around the windows, interior windows, then a waterbrush to spread and weaken the colour for the rest of the interior, and then did the same with the side window. I then took a pinky red brush pen to add highlights and details to fender and hood. Finally, if you look at the front wheel you can really see the difference it makes when you add details in ink on top of the paint.


16) I was on the home stretch by this stage. I used a thick black ink pen (0.8mm) to darken the rubber seals around windscreen and windows. I then used a black brush pen, and a watery brush darkening areas. It’s most obvious in the interior through the windscreen. However I also used it in the front wheel arch, and between the front tyre and the bumper. The edge of the bonnet I first applied brown bush pen before a touch of black on top.


17) And this is it. More work with the ink pen to outline details, for example on the headlights, the bonnet and the bumper. I added some darkening to areas between Also I did a little work with a red brush pen in areas on the bonnet and the fenders just to strengthen the colour in places.

That’s it. I’ve never actually driven a Beetle, but it’s always struck me as fun. So I wanted to try to get some of that across in my painting. And that’s what I think I’ve done by a mixture of playing with and slightly distorting the perspective, by using spatter, and by being looser with the colours, allowing them to mingle in the watercolour stage, and strengthening them with the brush pens. Also a touch of orange on the side lights and on the panels on the bumper. That's it.

I hope that you have as much fun with yours. If you have a go, I'd love it if you put a message in the comment section to let us know how you got on. If you could post a picture, that would be brilliant.