A client saw my sketch of Pontrhydyfen Aqueduct - which you can see for yourself in my sister blog 100 Faces of Port Talbot - click on the link below
and contacted me to ask if I could paint a picture of Pontrhydyfen.
"After a fashion," I replied, "I can." So here it is - 16x12in, acrylic on canvas board:-
Made in the most difficult conditions - sitting balancing book, paint box and water bottle on the narrow seat of a bus shelter directly opposite the Tate Britain building - which incidentally is the original Tate Gallery - when I was growing up in London there was only the one, and this is it.
Urban Sketching
This is such an easy thing to do, and such a simple idea,
but it’s something that people tend to get really passionate about. If some of
you reading this page are inspired to get out and start sketching for yourself,
then I’d be really proud.
What is it?
Like I said, it’s a simple idea. If you want to get right
down to basics, urban sketching is just giving a name to something that loads
of people have been doing for a long time – sketching the world around them. As
a movement, it began in Canada, as a group of sketchers in an online forum “for
all sketchers out there who love to draw the cities where they live and visit,
from the window of their homes, from a cafe, at a park, standing by a street
corner.” I suppose that the big difference between this and the thousands of
people who had already been doing this themselves was the idea of a community,
and the use of the internet – Facebook, blogs etc, - as a forum and gallery.
The manifesto of the Urban Sketching Community is: -
We draw on location, indoors or out, capturing
what we see from direct observation.
Our drawings tell the story of our
surroundings, the places we live and where we travel.
Our drawings are a record of time and place.
We are truthful to the scenes we witness.
We use any kind of media and cherish our
individual styles.
We support each other and draw together.
We share our drawings online.
We show the world, one drawing at a time.
Now, as a statement of aims and principles, if that doesn’t
light your candle I respectfully suggest that you may be reading the wrong
article.
If you’re still interested. Then here’s a few observations
which might hopefully help you make up your mind to give it a try.
1) It really isn’t
about being ‘good’ at it.
When I talk to people about Urban Sketching, the first
negative note that they strike is – ‘I’m no good at drawing’. To which I reply
that your ability is irrelevant. If you want to produce a perfect photographic
representation of a scene, then take a photo. Good is a subjective concept,
anyway. I know what I mean by the word when applied to a sketch, but chances
are you may have quite a different idea.
* It’s not a competition – you will always see sketches by
other sketchers that you think are much ‘better’ than yours. I do, a lot. But
here’s the thing - it doesn’t matter. Your sketches will have value for what
they are, and not for what they are not.
* The more you sketch, the more likely you are to improve
anyway.
* Your sketch is your vision, it’s your interpretation of a
small part of your world. Urban sketchers like to share work, but at the end of
the day it is up to you whether you share, and if you do, other urban sketchers
will respect it for that.
2) You don’t have to
follow a set of rules
When you start urban sketching, you’re not burdened down by
any onerous set of rules and regulations to follow. You won’t be told words to
the effect of – “All well and good, but it’s not an urban sketch because . . . “
So, for example, if you sketch on your own, it’s still an
urban sketch, and if you sketch with a friend or a group, it’s still an urban
sketch. If you’re sketching a building it’s an urban sketch, and if you sketch
a person sitting at a table inside a building, it’s still an urban sketch. Don’t
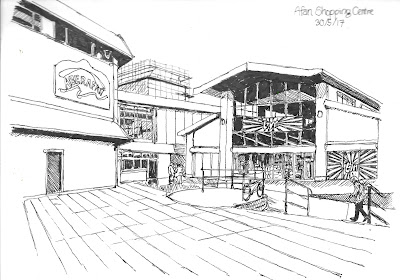
let the word ‘urban’ restrict you. This seemingly idyllic country scene on the
left: -

is just as much an urban sketch as this town centre shopping mall
below: -
It can still be an urban sketch whether you sketch with an
ordinary graphite HB pencil, or a biro, or an elegant fountain pen, or a
specialist sketching ink pen. It can be a sketch if you leave it monochrome, or
if you apply watercolour to it. It’s your sketch, so the decision is all yours.
Now, bearing in mind the Urban Sketching manifesto we looked
at earlier, you might well say – do you HAVE to sketch on location? - Well,
preferably, yes. But I personally wouldn’t say that there is anything wrong
starting your sketch on location, but using a reference photo taken
at the same time to finish off details later on.

For example, in June
2017 I made this sketch of a derelict old building I saw as I was driving
through the Afan Valley. I stopped, whipped out pen and sketchbook, and began.
It was a blazingly hot day, though, and after about 30 minutes I could feel
that I was going to be in trouble if I didn’t go out of the sun. So I took a
reference photo, and finished the sketch later on at home.
I usually carry a small pocket camera with me as well as
sketchbook and pen, in case I don’t get to finish the sketch that I am making.
Also, if you’re just starting out, or if you’re looking to improve your
sketching I don’t think there’s necessarily anything wrong with practising with
your own photographs. If you are going to do this, though, try to use your own
photographs. At least they show your vision, rather than somebody else’s, and
remember, this is just preparation for getting outside and doing it for real.
3) You can start
anywhere, and any time.
It’s only natural to feel a little nervous and self-conscious the
first time that you make a sketch on location. But you don’t necessarily have
to start out in public. If you’re nervous, maybe you could start with the great
indoors rather than the great outdoors. What can you sketch in your own house?
Well, pretty much anything, really. Here’s one of the first sketches I made
when I was first turned on to urban sketching.
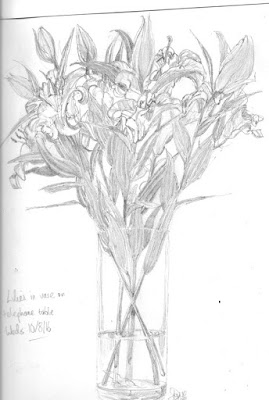
It’s a vase of lilies, which was
sitting on the telephone table next to my TV chair. Now, if I was to sketch the
same subject today I would go about it in a different way. I’d probably use a
pen, mostly because I like the graphic quality that a shaded pen and ink
drawing can give you. I’d also probably put it in context by drawing in some of
the surroundings. Is it a caught moment in time? Maybe not as obviously as some
of my sketches, but at least it captured that moment when the lilies were
mostly part opened.
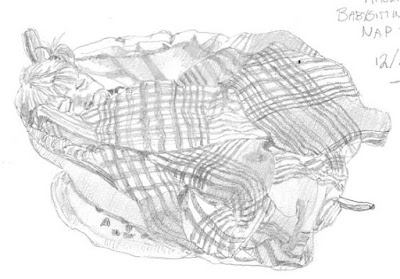
Another sketch I made at the time was this one. My granddaughter
Amelia was about 16 months old when I sketched her while she was having an
afternoon nap. I’m so pleased I did this, because it caught that moment in
time, and also that moment in Amelia’s life. Really and truly, it was a perfect
opportunity to create a sketch, since Amelia is only ever still enough to
sketch while she is asleep.
When you’re ready to take your sketching into the world outside,
people usually don’t even react when you’re making a sketch on location, and
when they do react, it’s nearly always in a noncommittal or a positive way. If
you’re sketching solo, then there’s no rules about how you should react if a passer-by
interests him or herself in your sketch, but as in everything else, a little
politeness costs nothing.
4) You can sketch
ANYTHING. Every picture can tell a story
Lots of people get into urban sketching as an enjoyable way
of preserving memories of trips or journeys. Not long after I began making my
first urban sketches at home I made a visit to Ieper in Belgium, during which
time I made several sketches of notable buildings, including this sketch of the
famous Cloth Hall. I made this while enjoying a coffee at a café in the shadow
of the hall. I’m not very good at sitting down and just letting the world go
by, but making a detailed sketch like this one requires time, and so I had to
sit there for a while. All the time, I was looking at the building more and
more closely, seeing the details in a way I wouldn’t have done if I’d only
taken a photograph. Not only that, but several Belgian passers by stopped to
look, and I had lovely conversations with all of them. All of which built my
confidence, and encouraged me to go out and about my local town and sketch some
of the more interesting buildings.
So, for example, I sketched this, the empty 1940’s cinema just a few
hundred yards from my house. After I returned from Belgium I made a decision to
try out a specialist ink sketching pen. While I love the subtlety that you can
get in shading using even an ordinary HB pencil, I really wanted to try to get
the graphic quality I’ve seen in other sketcher’s ink sketches. While a
derelict building may not be everyone’s idea of a good subject for a sketch,
the point is that I thought it was, and since I was the one sketching it, then
that was all that mattered.
* If you take up
urban sketching, over a period of time your ‘eye’ will develop.
I guarantee that once you’ve been urban sketching for a while, your
own style will develop and crystallise, and your way of looking at things, of
seeing things will change. If you compare two of the pictures I’ve already
shown you, it might be easier to explain: -
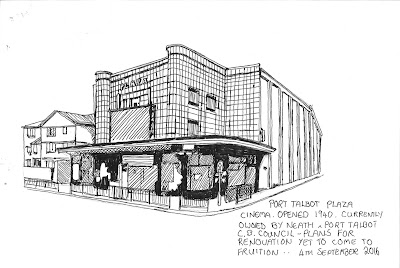
Both of them are sketches of derelict buildings in Port
Talbot which should be a lot better looked after than they currently are. On
the earlier sketch, of the cinema, that’s pretty much all you get. There’s no
context to it, nothing really to distract you from the building itself. While
the recent sketch on the right doesn’t just give you the building, it also
gives you the context – the houses and buildings on the roadway above and to
the left, and the hillside in the background. To my eye, the picture on the
right tells a story of a building that had been neglected, but still has a
pride and dignity.
5) There is no such
thing as failure when you make urban sketches
We’ve already said that your sketches will have value for what they
are, and that’s true. Taking that a little further, this means that even when
you’re not happy with the sketch you have produced, it still has value. For
example, this is a sketch I made in Easter 2017 during a short visit to Prague.
The structure is a famous Prague landmark, the 14th century Charles
Bridge. Time was that I would have considered this sketch a failure. It’s not
that there’s a huge amount ‘wrong’ with what’s there, bar the fact that it’s
unfinished. I’d already been out sketching for an hour and a half, during which
time I’d made two or three other sketches, and it was a bitterly cold day,
which meant that by the time I’d got this far my fingers were numb, and so I
abandoned it. I didn’t take a photograph in order to finish this off later. So
I would have to say that I don’t think that it compares to this sketch I made
from the other side of the bridge an hour earlier.
Even so, it still has some
value, even if it’s just as the ‘sketch abandoned because I couldn’t feel my
fingers any more’.
What do I have to use?
That’s up to you. There are no hard and fast rules about
what medium you should work in. Pen and ink is very popular, but maybe you’d
feel happier starting off with an ordinary HB graphite pencil. The important
thing is to use what you are comfortable with, and use what will be most likely
to produce the results you want. You might like to look online at other
people’s work, and see the results they achieve using pencils, biro, ink pen
etc. This will give you an idea of the sort of media you’d like to work in
yourself. For what it’s worth, my own personal feelings are: -
Graphite pencils –
·
make it easy to remove rogue marks from your
page.
·
They enable you to do more subtle shading than
ink.
·
May be a good place for you to start
·
Don’t make such a distinctive mark on the page, and don’t photograph
or scan as well as ink if you want to display your work online.
This is a sketch of the famous Menin Gate memorial in Ieper in Belgium,
made on the spot using a plain HB pencil. You can get good results with
ordinary pencil, and if you prefer to use one, then you don’t need to look
anywhere else.
Charcoal –
·
A good charcoal sketch is a work of art.
·
Charcoal sketches photocopy and scan better than
graphite sketches.
·
You can get charcoal pencils, which give you the
expressiveness of charcoal, together with the ease of use of a pencil.
·
It can be harder to make fine lines and sketch
in details on a small pad using charcoal
·
Charcoal is a ‘messy’ medium
This charcoal sketch of Margam Castle in Port Talbot demonstrates some
of the attraction of using charcoal, or charcoal pencils. However I find a
sketch like this in charcoal takes far longer to make than an equivalent in
ink, and for me, the way that you blend charcoal in a picture makes it
different to a straightforward sketch.
Biro –
·
Biro sketches tend to scan or photograph better
than pencil sketches.
·
You may have a biro that you’re particularly comfortable writing
with, and so might be more comfortable sketching with it.
·
Biros are not primarily made for sketching. The
ink doesn’t flow as well or as smoothly as in a specialist sketching pen. Even
expensive biros can leave small blobs which will smudge.
This is another sketch that I made in Ieper Belgium. I used an ordinary
Parker jotter biro to sketch some of the ornamental detail on the world famous
Cloth Hall. I became frustrated with the uneven flow of ink, and the scratchy
nature of the shading lines. I find it more difficult to achieve good effects
using hatching and crosshatching when I’m working in biro.
Cartridge/Fountain Pen-
·
Sketches with this kind of ink pen scan and
photograph better than graphite sketches.
·
This kind of pen is often a bit thicker than a
biro or sketching pen, and many people find them clumsier to use because of
this.
·
Ordinary fountain/cartridge pen ink dries more
slowly than biro ink, or sketching pen ink. Using this kind of pen you run the
greatest risk of smudging.
·
Most ordinary fountain/cartridge pens have a nib
which makes a line that is rather thicker than is ideal for sketching.
Gel Pen -
·
Gel pens have the same advantages as a biro, and
the ink flows more freely and evenly than in a biro.
·
Personally, I don’t often like sketching with a
ballpen – and a gel pen is essentially a ballpen, it just has a different kind
of ink. I find that ballpens can be very unforgiving if you put even slightly
too much pressure on the paper.
Ordinary felt tip – felt writing pen-
·
A felt tip colouring pen will produce sketches
that copy, photograph and scan better than a graphite pencil.
·
A felt tip colouring pen has a nib which is
thick – too thick, in my opinion, for sketching.
·
A felt tip note writer does use a kind of ink which has a habit of
soaking through even a quality sheet of paper.
Specialist Sketching Pen -
·
Produces sketches which consistently photograph, scan, and copy
better than graphite.
·
Comes in a variety of nib sizes, which makes it
easier to reproduce detail
·
Uses ink which a) – dries almost
instantaneously, and b) – will not show through the back of a piece of quality
sketching paper
·
Is still highly effective if you apply a
watercolour wash to it.
·
Is more expensive than any ordinary pen or
pencil.
St. Catherine’s Church, Baglan, Port Talbot. The first sketch I ever
made with a specialist sketching pen. The fact that I have been using pens like
this to sketch with ever since should give you an idea of how highly I rate
them. The lines have the boldness of biro, and actually scan or photograph even
better than biro in my opinion. The shading effects are better – in my opinion
– than you get with biro, and I find them easier to sketch with than even a
good biro.
Watercolour
I personally wouldn’t make a sketch using just a paintbrush
and paint. However, there you can get some great effects by adding washes of
watercolour to your ink sketches. Here’s one of the examples I’m happiest with:
-
St. Joseph’s Church, Port Talbot.
My first urban
sketches, like the sketches of the Menin Gate and the Cloth Hall, were made
with a graphite pencil. Subsequently I tried biro, gel pen and felt writing
pen, but I’ve settled on specialist sketching pens, which produce results
closest to what I want.
But remember –
there’s no hard and fast rules. It’s what works for you.
Paper
I don’t recall ever making an urban sketch on the back of an
envelope, but I’ve used a wide variety of paper in my time, much of which was
never intended to be sketched on.
The fact is that you can get decent results on whatever you
use. There’s no rule which says that you can’t use an A4 pad of plain paper
from your local supermarket, which will cost you next to nothing. Of course,
the paper itself is likely to be only slightly thicker than tissue paper, and
so don’t expect to get your very best results on it.
You can buy a sketchbook for not a lot more. When you’re
starting out there’s not a huge amount of difference between the sketchbook you
buy for a pound in a discount store, and a sketchbook that costs four times as
much for half the number of pages in a specialist art suppliers.
As your eye develops, and you start doing things like applying
watercolour washes to your sketches, though, you will find a difference.
Personally, I like a soft cover, 20 page sketchbook from a well known art
supply company, with paper that is 140 gsm/2. That’s still a lighter paper than
I’d use to paint a full watercolour, but it takes a watercolour wash quite
well.
If you’re going to carry a sketchbook with you almost
everywhere you go, then an A4 book is not the most practical choice. A5 is a
much handier size, but I think that it’s still large enough to allow you to
make a detailed sketch of a whole scene. While I like A4 as well, for most of
my sketches I use an A5 book.
Once again, though, there’s no rules about it. My advice is
to try out different papers and sizes of sketchbooks, and when you find what
works for you, then use it.
With materials, as with almost anything else – you get what you pay
for. Maybe when you’re starting out there’s not that much difference between
the results you can achieve on using very basic pens and paper, and more
expensive specialist pens and sketchbooks. As you improve, though, the
difference in quality should become more noticeable.
How can I start? :
If I’ve managed to whet your appetite for sketching then you
really should start straightaway. Once you’ve started making sketches, then the
whole process should become something normal to you, and once you get over a
few mental hurdles this should become a source of relaxation and pleasure to
you.
Let’s remind ourselves of a couple of things before we
start: -
* Whatever you make, it is your sketch, and has validity for
that reason. You don’t HAVE to show it to anyone.
* Whatever you may think of how good or otherwise your
sketches are, they are your starting point. This is just the beginning of your
journey.
* There are many, many urban sketching forums on the
internet where you can explain that you are just starting out, and show your
sketches, and get positive feedback on them. That’s really half the fun of
making them.
When you're sketching
* Spend a bit of time thinking about the vantage point from which you
will make your sketch, and then simplify the image – in your head, cut out the
things that you don’t want to include. Try to visualise what your finished
sketch will look like.
* With the drawing, mostly, it’s just lines, straight lines, and curved
lines. Take the most important element of your sketch, and start by
constructing its outline, one line at a time. Look at the way that lines relate
to each other – see which lines are essentially repeating a shape that you have
already made.
* Now sketch in the outlines of other elements of your sketch.
* Decide how much detail you wish to include, and then sketch in these
details.
* Apply shading – you can use a mixture of hatching, cross hatching and
black shading to create different
intensities of shadow.
* Practise doesn’t necessarily make perfect, but we’re not aiming for
perfection. Practice making sketches in this way until you don’t even have to
think about what to do next when you’re making one.
Sketching Outside:
Buildings
An urban sketch doesn’t have to feature a building. However, if you
search online you’ll find that the vast majority of urban sketches people want
to share with the world do depict buildings in some form or other. The rest of
this section is a tutorial on how you might like to go about constructing a
sketch of a real building. As with the previous section, I have to demonstrate
with a photograph, but the same techniques apply when you’re sketching en plein
air.
Cardiff Wales
National Assembly Building
This is an example of
the kind of sketches of buildings I was making in my earlier days as an urban
sketcher – I’d do it from a different angle if I sketched the same building
today. There just so happened to be a handy bench right in front of it, though
. . .
Your first sketching
expedition
You’ll know when you feel ready to take your first steps in
sketching outdoors. When you are, it’s only natural to feel a bit nervous or
apprehensive. I feel there’s two ways of approaching this.
Approach One – Make it as easy on yourself as possible
* Go local. Ideally you’re looking for a subject to sketch
that is in easy walking distance, that you know well and don’t mind staring at
for a little while, and that has a convenient place for you to sit and sketch
it.
* Don’t burden yourself down with equipment. Take one
sketchbook, and whichever implement you want to sketch with. That’s enough for
now.
* Decide before you go how long you’re going to want to
spend. Are you going to stay until it’s finished, or give yourself a maximum
amount of time to spend on the sketch? Whatever you decide, stick to it.
Approach Two – Make it a special event
* Make a proper outing of it.
* Plan to visit somewhere you’d like to spend a day or an
afternoon visiting.
* Take a bag, that way you can carry lunch and a drink as
well as your equipment.
* Spend time choosing a subject that appeals to you when you
get there. Going away from your local area has the benefit of the fact that
everyone else there at the time will be a stranger to you, which should reduce
the amount you feel self-conscious and embarrassed.
* Allow as long as it takes to make your sketch, but also do
other things you enjoy while you’re there, so the sketch will also become a
memory of a good day.
Whichever approach
you use: -
* You’ll probably feel rather self-conscious at first. Don’t
worry, it’s natural. For pretty much everyone the feeling does fade quickly
when you become absorbed in the sketch you are making. You’ll probably find
that concentrating on your sketch may even give you an invisible aura which
will discourage people from staring at you or approaching you.
* If you’re desperate to avoid contact with other members of
the public, consider putting in a pair of earphones which are connected to your
phone, or any other personal device. Even if you leave your phone switched off,
they’re not to know that. This will just act as a little deterrent.
In my experience, if someone does approach and seem to be
interested in what you’re doing, stopping to smile and give them a better look
at the sketch is a polite way of responding, and in most cases the person
involved will either just smile, or pass a brief comment and go on their way,
allowing you to get on with the sketch in hand.
* Look Critically and
appraise your sketch
By this, I don’t rip it to shreds., either metaphorically or
literally. Criticism as a word has a negative connotation, but really it means
looking at your work objectively, seeking the bits you’ve done well, as well as
the bits you think you could have done better. The point is that if you like
the way one aspect of your sketch has turned out, well, it would be nice to be
able to repeat this in your future sketches. If you’re not happy with the
sketch, then try to give yourself a little bit of time to think about what it
is that you don’t like. Chances are it will boil down to one or two things – it
won’t be the whole sketch that you don’t like. Perhaps you don’t like the
positioning of the building on the page. Perhaps the shading in one or more
parts doesn’t work like you thought it would. Whatever the case, identifying
what you don’t like as a sketch will help you start weeding out the aspects of
your own work that you’re not happy about.
* Don’t expect too much in you first sketch made outside, in
public. Once you’ve made this sketch, then you’ve already succeeded in what you
set out to do. Whatever your opinion of the artistic merits of the sketch that
you’ve just produced, cherish it for the fact that it marks an important step
forward on your journey.


