Anyone can draw a relatively straight line. Anyone can draw a curved line. Well, when you boil it down to basics, that’s all any drawing really is, lines on a page. So it really comes down to assembling the right lines in the right places.
So we’re going to draw a lovely old VW Beetle. Sometimes you’re going to make straight lines. Some times you’re going to make curved lines. You can do that. You can draw with your hand. What I want to help you do is to draw with your eye.
Your eye is just as important as your hand. Your eye has to tell you where your line is going to start, and where it’s going to end. It will tell you how steep or shallow your curve is going to be. It will tell you how high up a particular line ends. You might even find that it helps you to make a dot on the page where a particular line will end, and then ‘draw’ the line in your mind’s eye before you draw it on the page.
If you’re tentative about drawing, or just starting out, or are worried that you don’t have the ‘talent’, well, have a go at the stages I’m going to show you. Don’t think about the finished picture, just the next stage. One stage at a time.

1) We’re going to draw the car facing to the left. I started by drawing the headlight, because it’s about halfway along the length of the page, and about a 3rd of the way up. It gives me a reference point around which I can draw the rest. It’s an oval, thinner than a full circle, with a fatter semi circle joining it on the right. Try it, and don't worry about what comes next.

2) You make one curving line for the top edge of the fender. Think of it like this - we’re going to draw the face of the car before we do the full outline. I’d usually start with pencil, and then go over it with ink, but ink shows better for demonstrations so I've gone straight in with the pen. Don’t get too worked up about proportions. If you’re working in pencil you can always make adjustments. Just make that nice very gentle curve upwards. If you like, make a small dot where the line is going to end, join it up in your minds eye, then draw it when you’re happy.

3) Now add the slightly more complicated curve underneath, joining it back up to the top curve. Look at where it starts on the left, underneath the headlight. Do it in stages, curve it upwards to just above the level of the headlight. Now curve it round, and then steeply down. If you look carefully, you’ll see we’re not quite going as far down as the start of the line. Now, from the bottom of that line, go upwards and slightly to the right, and then curve right round to join with the top of the fender that you drew last time. Now you’ve pretty much completed that first fender. Again, don’t get hung up about whether you have the proportions right . Repeat after me – we are not trying to make a photograph!


5) So now we start to add the bumper. You might find it easiest if you make a little dot level with the centre of the headlight, not quite halfway between the centre of the headlight, and the left hand edge of the page. This isn’t quite the edge of the bumper, but it is where the rope wrapped around part of it ends. Draw a relatively straight line down to the bottom of the two small lights you just drew. Draw another line slightly underneath the bumper from about halfway along almost to the small lights. This is the top of the number (license) plate. Draw a ring around the bumper, just to the left of the number plate, then link it up with the end of the bumper. Draw in the other lines to complete the plate. Now go back to the top line of the bumper, and curve it very gently upwards to meet the bottom line of the fender. Finally, at the bottom of the fender, where it just starts to curve upwards. Make that very small line curving down, which will be the edge of the bumper.

6) This stage is the longest yet, but when you’ve done it, your car will already be looking like a Beetle. At the end of the bumper, on the left hand side, just extend it curving upwards slightly. Draw in the bottom of the bumper, and then make the lines to make it look as if there are coils of rope around the left hand side, next to the number plate. Look at the nearest fender. Draw a straight, upwards line, from just left of where it extends downwards, to slightly about the height of the curve of the top of the fender. Then draw a slightly curving line from the top of the curve of the fender to this line. This creates the edge of the bonnet (hood).
Now make a small dot, above the one of the two small lights above the bumper, that is on the left. It should be slightly higher than the top of the edge of the fender on the right. Starting from just above the top left-hand edge of the number plate, curve a line slightly to the left, then to the right to join up with the dot you’ve made. This is the other edge of the bonnet. Now, to the left of the top edge of the bonnet, a little way above the bumper, you’re going to make the other headlight. It should be a smaller oval than the other headlight. Don’t forget the slightly wider semi-circle on the right-hand side. Then about a third of the way down the oval, draw in the ‘eyelid’, like a wide, short triangle.
From the top of the light, draw in a curve slightly upwards and to the right to meet the edge of the bonnet. They should meet at about the same height where the nearest fender starts curving downwards. Finally, draw a short, slightly curving line, from about halfway down the left hand edge of the far headlight, to meet the bumper.

7) There’s not so much to do in this stage, but it’s important. Firstly, draw a line to link the top and bottom edges of the hood. It should make a very slight convex curve. Look at the downwards angle it makes. This should be less steep than the downwards angle of the bumper you’ve drawn. If you need to lessen this angle, redraw the line going from slightly further down on the top of the hood.
Now we’re going to start to draw in the nearest of the wheels. This is a much taller and thinner oval than the headlights. It should be furthest away from the right hand edge of the fender, and curve closest to the fender on the left, where the fender starts to curve down to the bumper. I’ve deliberately ‘bent’ my oval, but you don’t have to do this. A regular one will work just as well. Finally start from the right of the oval you’ve drawn, and use a more gentle curve to join it with the top of the fender. You can also draw another short curve down from the front of the fender to make the edge of the tyre.
 |
8) We’ve almost completed the face of the car now. Draw in those two lines in the bonnet. They should be curves, which start about a quarter of the length of the top of the bonnet in from the right hand side. They can largely reproduce the curve of the top edge, converging almost in the middle of the bonnet where it reaches the bumper. You can also draw in the two curves inside the edges of the bonnet.
Now we draw the windscreen (windshield). The lines on the sides of the screen both slant towards the right. However the one on the right should have the more pronounced slant. This helps give the car more dramatic perspective. Both should reach a similar height. Join them with a very gentle convex curved line, but the curve should be more pronounced where it joins the line on the right.
 |
9) Now we’ve completed the face of the car, we can start on the body. I’m deliberately exaggerating the perspective of my beetle, so I’m consciously drawing the body of the car rather shorter than it is in real life. Make a dot on a level just above the centre of the wheel you’ve drawn, and about twice the distance across the wheel. Then draw a curving line from the dot to the bottom of the fender. Then make another dot, a little to the right of the end of the line you’ve just drawn, and on a level with the top of the fender. Draw one straight line from the dot to the top of the line that comes straight up from the fender, which meets the line of the hood. Now join the two dots you made. Drawing downwards, go slightly to the right , and then leftwards to join with the line on the bottom.
Also, to finish the windscreen, can you draw another line just inside the outline all the way round. This will make the rubber seal.
 |
10) Now we’re going to make the side windows. Make a line slightly to the right of the edge of the windscreen. It should curve away from the windscreen as you get close to the top and should not quite go so far up. At this stage it might help if you draw in the little handle shape inside the body panel you drew last time. The handle should be about 2 thirds along the length. Now you can draw the bottom edge of the window you’ve started. Don’t go quite as far as the handle, then draw an upwards line, not quite to the level where you started curving it away from the windscreen. Then draw a line connecting the left and right top edges of the window. Now. Extend this line, curving quite sharply downwards to connect with the top right hand edge of the body panel. Now, just very lightly draw a line just inside the outlines of the windows, just as you did with the windscreen.

11) Basically there’s the roof and the back wheel left. I did the back wheel first. Now, I began by making a line from the bottom of the body panel. It curves around, away from the panel to about halfway up the panel, then back down and round. Then I drew a curve from where this ender curves back round, and this curve goes up to where the body panel curves back round from right to left. For the back wheel, I drew a very thin oval, from about the same level as the bottom of the body panel, up to join the fender before it’s complete. Then a wider oval outside this first one, which extends a little further away from the inner oval at the bottom. This outer oval should be peeping out below the level of the body panel. Finally, from the bottom of this outer oval, draw a line curving gently upwards until it meets the body panel.

12) Last section of the drawing stage is the roof line. So, draw a line which very gently curves upwards from the left hand side of the windscreen. This upwards curve should start curving more steeply downwards from above the right hand edge of the windscreen, joining the top line of the side windows where they start to curve steeply downwards.
And that’s it, that’s the drawing stage of your beetle done. Now, how you colour it, what media you use, what colour scheme you use is up to you. I’m going to use a two tone colour scheme. Strictly speaking it should be read with white panels. However, I’m substituting yellow, as I can get better paint effects that way.
The materials I use are watercolour paints, and water soluble brush pens.
 |
13) I started with the font tyre and the wheel arch below the fender. This is just watercolour. I tend to throw the kitchen sink at the front tyre in terms of colour, because when they’re wet, the colours can give some nice effects when they mingle, and it doesn’t have to affect the colour scheme of the car’s body. Also, I’ve learned not to worry about staying between the lines. Taking a looser approach can add energy to your picture and stop it from laying flat and two dimensional on the page. Also you might want to allow some of your colours to mingle underneath the bumper and the body of the car between the wheels. When I did this I noticed that I hadn’t drawn in the line marking the end of the body panels, and making a very small running board between the fenders, so I drew this in. In this stage the colours I used were
Red – this will be the main colour of the body work, and I let this seep from the fender, through the wheel arch onto the tyre.
Yellow – on the tyre
Blue, on the tyre
Black, very watery, on the tyre, underneath the bumper, and between the wheels. An even more watery grey is on the front wheel as well.
Blue – on the tyre, under the bumper
Purple – just a hint beside the bottom of the number plate
Viridian green – very lightly between the wheels.
 |
14) Before I began the bodywork, I spattered the colours I’d already used. All this meant was that in turn I charged the brush with each of the colours I’d used. I tapped it down onto another brush above the paper to create the spatter. With this kind of picture I always want to try to bring energy to it, and to make it pop off the page. This helps. I applied a quite watery red quickly to the bodywork, and then the yellow to the panels. This created the blush where the red has seeped into the yellow. Some blush is quite intentional, but it’s difficult to judge just how much you’ll get. Go with the flow, and don’t worry about it, is my advice.
While it was still wet I just introduced a little blue beneath the windscreen as well. I allowed the paint to dry quite a bit before I applied the red again to create some of the detail on the bonnet and fenders, and used the yellow for the rope on the end of the fender. Finally, although the scanner hasn’t picked it out very well, I used a light blue wash in the windows.
That was as much as I wanted to do with the watercolour paint. Don’t worry if you think it looks a bit of a mess at the end of this watercolour stage. I always think that my pictures look a mess at this stage.
15) Here’s where I’d started applying brush pens, and also using my black ink drawing pens as well. I could have used a black brush pen and a waterbrush to get a grey interior, However I went with the green, partly because a couple of my reference photos show the interiors with a dull, greeny tinge, and partly because the green really contrasts with the dominant red of the bodywork. I used the green brush pen around the windows, interior windows, then a waterbrush to spread and weaken the colour for the rest of the interior, and then did the same with the side window. I then took a pinky red brush pen to add highlights and details to fender and hood. Finally, if you look at the front wheel you can really see the difference it makes when you add details in ink on top of the paint.

16) I was on the home stretch by this stage. I used a thick black ink pen (0.8mm) to darken the rubber seals around windscreen and windows. I then used a black brush pen, and a watery brush darkening areas. It’s most obvious in the interior through the windscreen. However I also used it in the front wheel arch, and between the front tyre and the bumper. The edge of the bonnet I first applied brown bush pen before a touch of black on top.

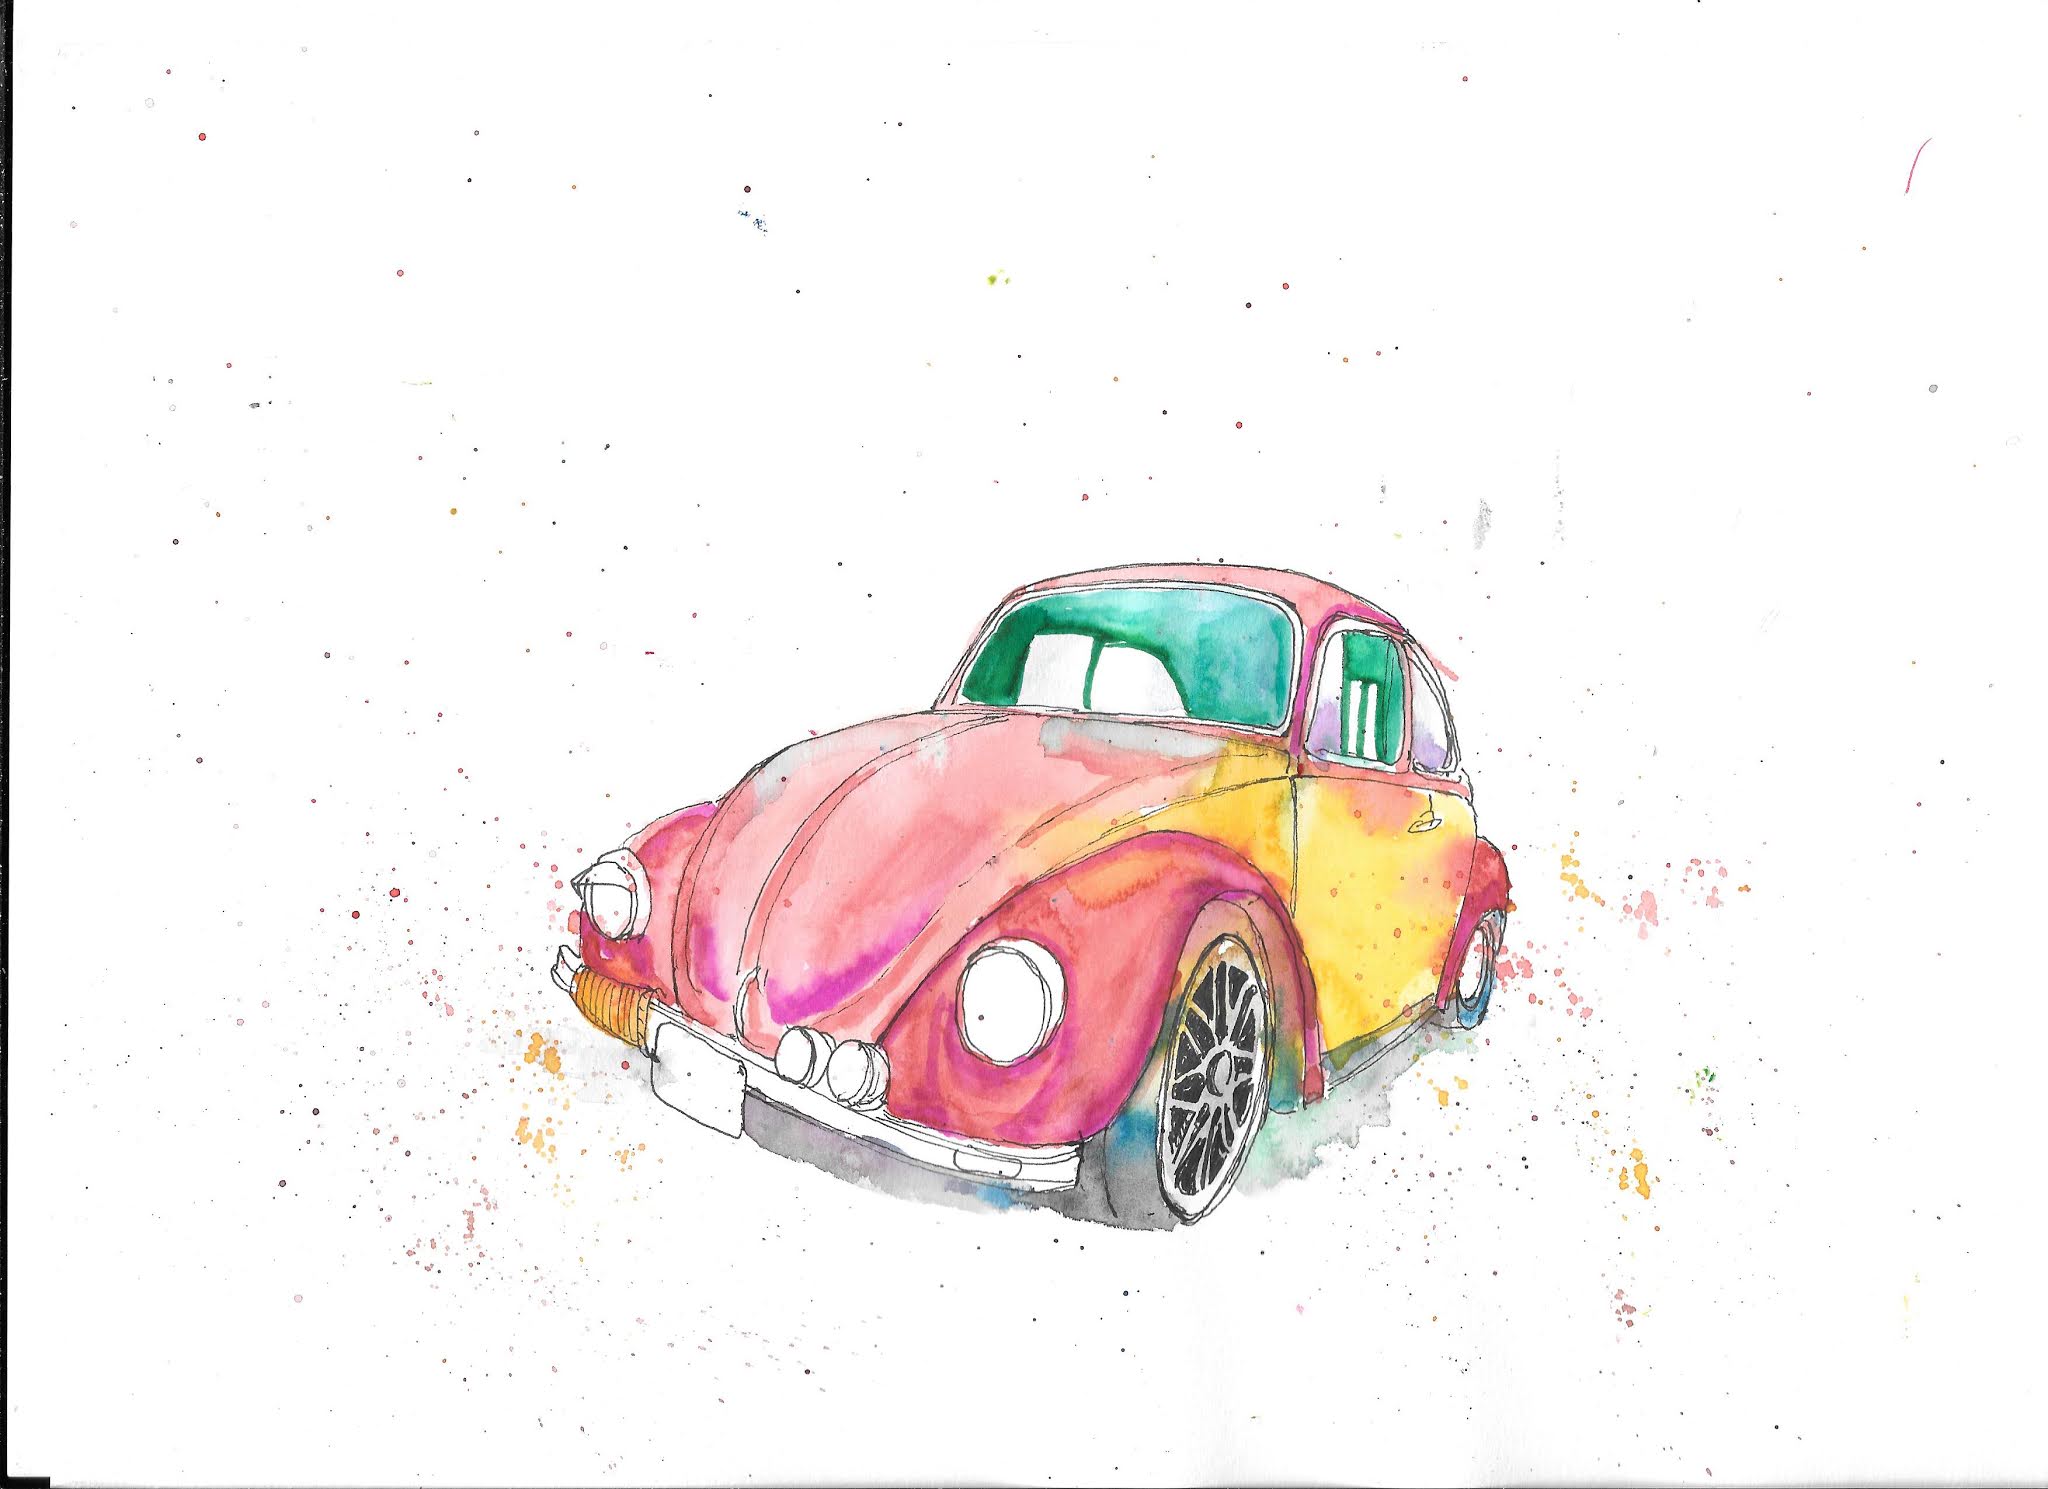
17) And this is it. More work with the ink pen to outline details, for example on the headlights, the bonnet and the bumper. I added some darkening to areas between Also I did a little work with a red brush pen in areas on the bonnet and the fenders just to strengthen the colour in places.
That’s it. I’ve never actually driven a Beetle, but it’s always struck me as fun. So I wanted to try to get some of that across in my painting. And that’s what I think I’ve done by a mixture of playing with and slightly distorting the perspective, by using spatter, and by being looser with the colours, allowing them to mingle in the watercolour stage, and strengthening them with the brush pens. Also a touch of orange on the side lights and on the panels on the bumper. That's it.
I hope that you have as much fun with yours. If you have a go, I'd love it if you put a message in the comment section to let us know how you got on. If you could post a picture, that would be brilliant.
No comments:
Post a Comment